Original Polish version by Lukasz Kopciuch
The
port forwarding enables redirection of Internet packets (TCP and UDP
protocols mostly). Depending on the implementation and device used (e.g.
router), the packets are forwarded to the default TCP and UDP ports of
the local computer(s), or to other ports.
Many
owners of modern CCTV systems want to have access to the surveillance
video from the DVR(s) via the Internet, from anywhere in the world. If
the DVR is connected to the Internet via a router, the port forwarding
is a must.
Below we describe some common situations:
- 1. The DVR connected to the Internet via a DSL router
- TP-LINK TL-WR743ND N2956,
- TP-LINK TL-MR3420 N2957,
- TP-LINK TL-MR3220 N2958,
- TP-LINK TL-WR841ND N3250,
- TP-LINK TL-WR941ND N3251,
- TP-LINK TP-LINK TL-WR740N N3252,
- TP-LINK TL-WR1043ND N3253,
- TP-LINK TL-WR741N N3254,
- TP-LINK TL-R860 N2990,
- TP-LINK TL-R460 N2991,
- TP-LINK TL-R402M N2992.
- 2. The DVR connected to the Internet via an ADSL router
- TP-LINK TD-W8960N N2904,
- TP-LINK TD-8816 N2906,
- TP-LINK TD-8840T N2907.
- TP-LINK TD-W8950 N2908.
- 3. Two devices (e.g. IP cameras) connected to one router
- 4. A device (DVR) connected to the Internet via two routers
1. The DVR connected to the Internet via a DSL router
In
offices and other places where the Internet access is provided via DSL
lines (Ethernet networks, cable TV), the configuration of the port
forwarding applies to the router with an external IP address, connected
with the device (DVR).

The DVR connected to the Internet via a DSL router
Port forwarding configuration of TP-LINK TL-WR740N N3252 router for remote viewing of the DVR via the Internet:
By
typing into the browser (or dedicated managing software) the external
IP address of the router (with a suitable port number, pre-programmed in
the router), e.g. 10.10.10.10:80, the user can connect to the DVR and
monitor the video from the cameras, as well as configure the DVR.
The
Hikvision DVR used in the example below requires forwarding of two
ports (80 - web browser, 8000 - other data). It cooperates with TP-LINK
TL-WR740N N3252 router.
- The first step is to log on the router's administration panel (the defaults for the local network are: http://192.168.1.1, user name: admin, password: admin), the second - to enter the Forwarding/Virtual Servers window and select Add new.
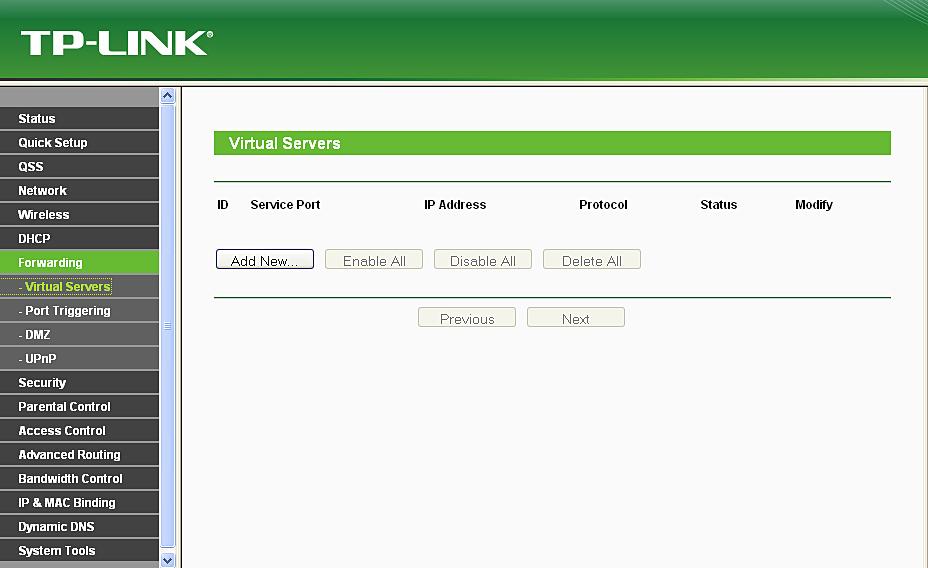
The Forwarding/Virtual Servers window
- Then we enter the number of the port to be forwarded (in our example, 80), IP address (192.168.1.100), protocol (ALL) and enable the forwarding (Enabled). Finally, we press Save:

The "Add or Modify a Virtual Server Entry" menu (port 80)
- We have to repeat the procedure for the port 8000:
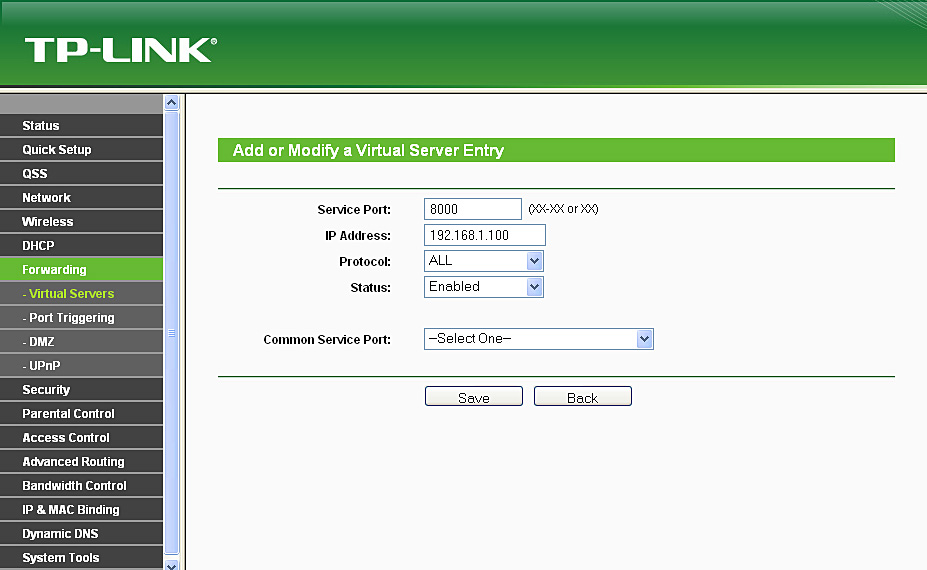
The "Add or Modify a Virtual Server Entry" menu (port 8000)
- After adding the two ports, the Forwarding/Virtual Servers window will provide the following information:
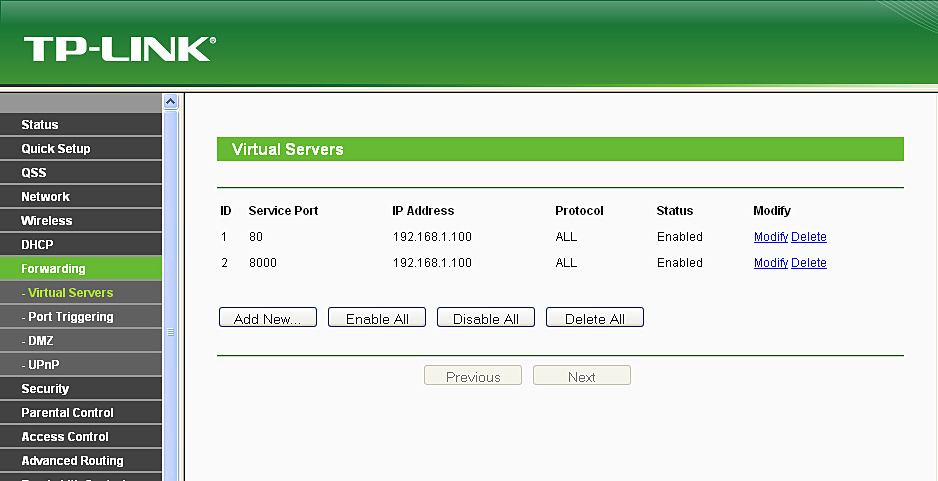
The Forwarding/Virtual Servers window after the operations
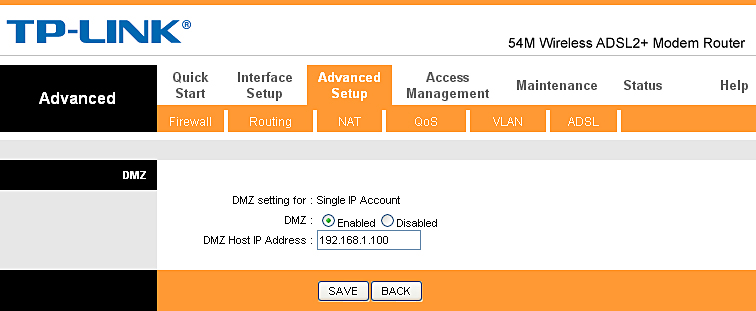
- To
forward all ports to the local device we can use the DMZ function where
we enter the local address of the device (in our case: 192.168.1.100)
and click Enabled:
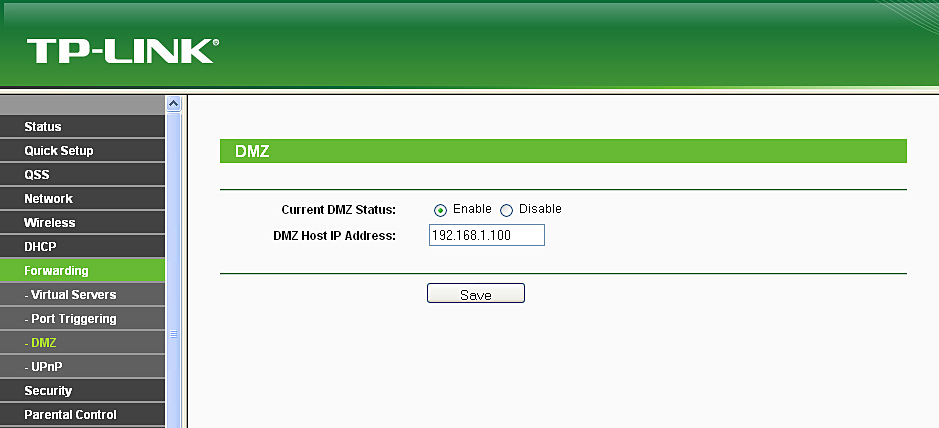
The Forwarding/DMZ menu
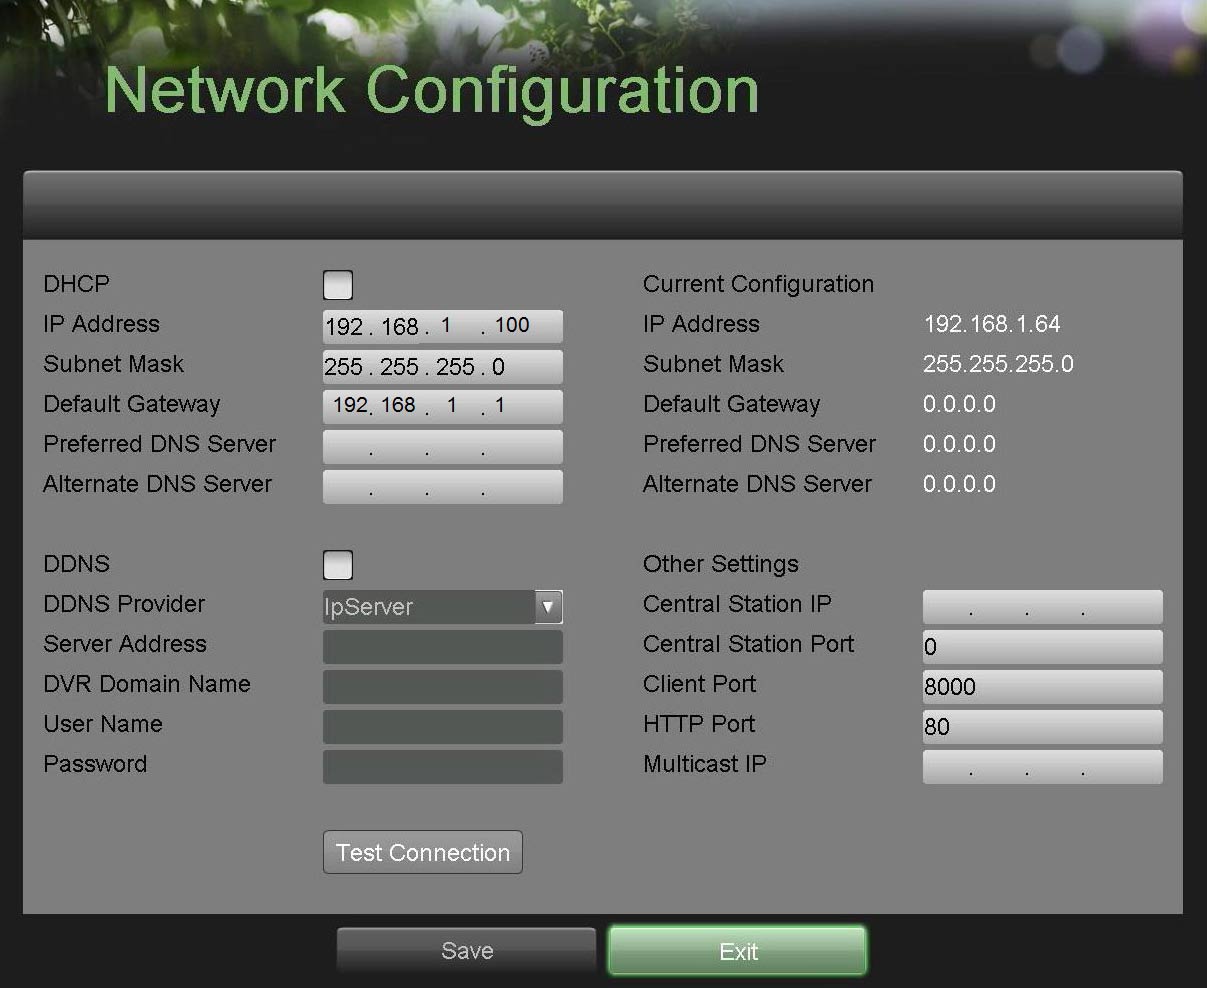
After configuring the router, we have to setup the DVR.
The necessary network settings will include:
- IP Address,
- Subnet Mask,
- Default Gateway (an indispensable parameter - the local address of the router connecting the DVR to the network),
- Client Port (8000) and HTTP Port (80).

The Network Configuration window (DVR)
2. The DVR connected to the Internet via an ADSL router
In
places where the Internet access is provided via an ADSL line, the
configuration of the port forwarding applies to the router with an
external IP address, connected with the device (DVR).

The DVR connected to the Internet via an ADSL router
The step by step configuration of TP-LINK TD-W8960 N2904 router, shown below, forwards its ports to the DVR, allowing remote viewing of images via the Internet.
The
Hikvision DVR used in the example requires forwarding of two ports (80 -
web browser, 8000 - other data). It cooperates with TP-LINK TL-W8950 N2908 router.
- The first step is to log on the router's administration panel (the defaults for the local network are: http://192.168.1.1,
user name: admin, password: admin), the second - to identify ADSL
profile (PVC - the active profile contains the IP address, mask and
gateway - in our case it is PVC2).
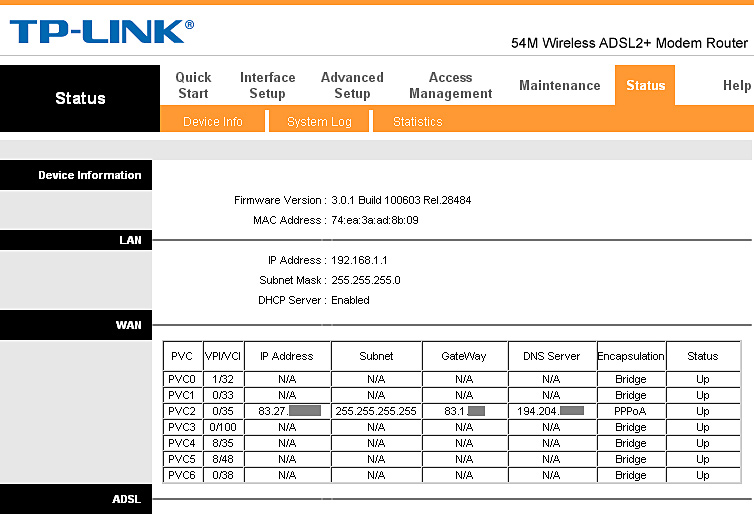
The Status window
- Then we enter Advanced Setup/NAT menu. We select the previously identified PVC2 and Virtual Server items.
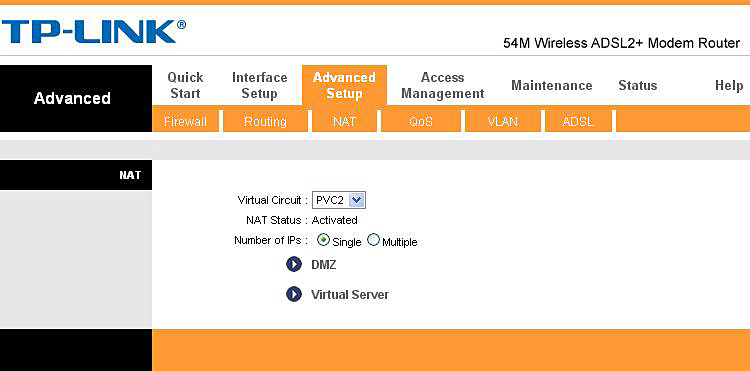
The Advanced Setup/NAT menu
- We enter:
- Rule Index: 1
- Application: Hikvision (the information is only for the network administrator)
- Protocol: ALL
- Start Port Number: 80
- End Port Number: 80
- Local IP Address: 192.168.1.100
Finally, we press Save.

The Advanced Setup/NAT/Virtual Server sub-menu (port 80)
- The procedure has to be repeated for the 8000 port:
- Rule Index: 2
- Application: Hikvision (the information is only for the network administrator)
- Protocol: ALL
- Start Port Number: 8000
- End Port Number: 8000
- Local IP Address: 192.168.1.100
All changes has to be confirmed by pushing Save button.
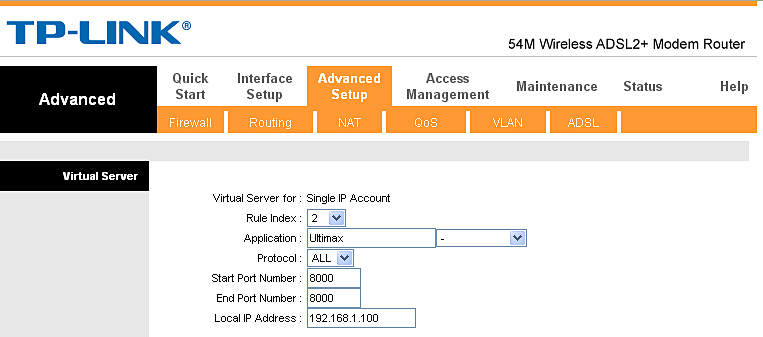
The Advanced Setup/NAT/Virtual Server sub-menu (port 8000)
- After adding the two ports, the Advanced Setup/NAT/Virtual Server sub-menu will provide the following information:
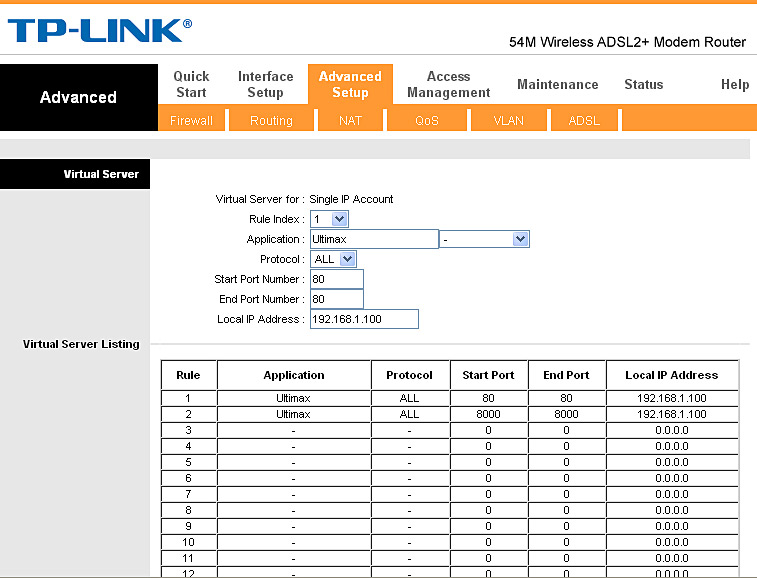
The final information in the Advanced Setup/NAT/Virtual Server sub-menu
- To forward all ports to the local device we can use the DMZ function (Advanced Setup/NAT/DMZ) where we enter the local address of the device (in our case: 192.168.1.100) and click Enabled:
The Advanced Setup/NAT/DMZ sub-menu
After configuring the router, we have to setup the DVR.
The necessary network settings will include:
- IP Address,
- Subnet Mask,
- Default Gateway (an indispensable parameter - the local address of the router connecting the DVR to the network),
- Client Port (8000) and HTTP Port (80).
The Network Configuration window (DVR)
3. Two devices (e.g. IP cameras) connected to one router
To
get access via the Internet to two devices connected to one router we
must remember that they have to use separate ports. Below there is a
diagram showing two cameras connected to the Internet.

Two IP cameras connected to the Internet via a DSL router
For each of the cameras there have been prepared the appropriate addresses and parameters presented in the table below:
| Camera 1 | Camera 2 | |
| IP Address | 192.168.1.101 | 192.168.1.102 |
| Subnet Mask | 255.255.255.0 | 255.255.255.0 |
| Gateway | 192.168.1.1 | 192.168.1.1 |
| HTTP Port | 80 | 81 |
| Client Port | 8000 | 8001 |
To log on from the Internet (computer 1) to the camera 1, using an appropriate web browser, the user should enter http://external_address:80 (the data is transmitted via port 8000); to log on to the camera 2 the user should enter http://external_address:81 (the data is transmitted via port 8001).

Two IP cameras connected to the Internet via a router
Of
course it should be remembered that the change of ports will alter the
way of accessing the cameras from the computer 2 in the local network -
to get to the cameras through an appropriate browser the user must enter
the following addresses: camera 1 - http://192.168.1.100:80, camera 2 - http://192.168.1.101:81.
4. A device (DVR) connected to the Internet via two routers
In
locations where the video monitoring network is separated from the
local network by an additional router, there is a problem of "double
NAT", which requires forwarding the appropriate ports of the main router
(1) to the ports of the additional router (2), and further the ports of
the auxiliary router to the IP CCTV device(s) e.g. DVR.

A device (DVR) connected to the Internet via two routers
The table below shows a possible network configuration of the network devices.
| Router 1 | Router 2 | DVR | ||
| WAN | IP address | External IP address (information from the ISP) | 192.168.1.100 | |
| Subnet Mask | Subnet Mask (information from the ISP) | 255.255.255.0 | ||
| Gateway | Gateway (information from the ISP) | 192.168.1.1. | ||
| LAN | IP address | 192.168.1.1 | 10.0.0.1 | 10.0.0.2 |
| Subnet Mask | 255.255.255.0 | 255.255.255.0 | 255.255.255.0 | |
| Gateway | 10.0.0.1 | |||
| Required ports | 81, 8001 | |||
To allow access to the DVR from the Internet, the administrator should:
- In the router 1:
- Forward the 81, 8001 ports to the external address (WAN) of the router 2: 192.168.1.100
- In the router 2:
- Forward the 81, 8001 ports to the address of the DVR: 10.0.0.2
No comments:
Post a Comment